CAD modeling and simulation is now a standard in many manufacturing businesses. These same manufacturers understand that measuring completed parts, and measuring incoming parts from suppliers, is an important part of validating quality. What Model Based Definition offers is the ability to use the completed CAD model and analysis to drive the entire quality process, creating a single source for specifications and quality information that, when applied throughout production, allows for manufacturing correlation and powerful problem solving to improve quality at every stage of the product lifecycle.
(Excerpt from the article Closed Loop Manufacturing: CAD Driven Supplier Quality published in Quality Magazine February 2018)
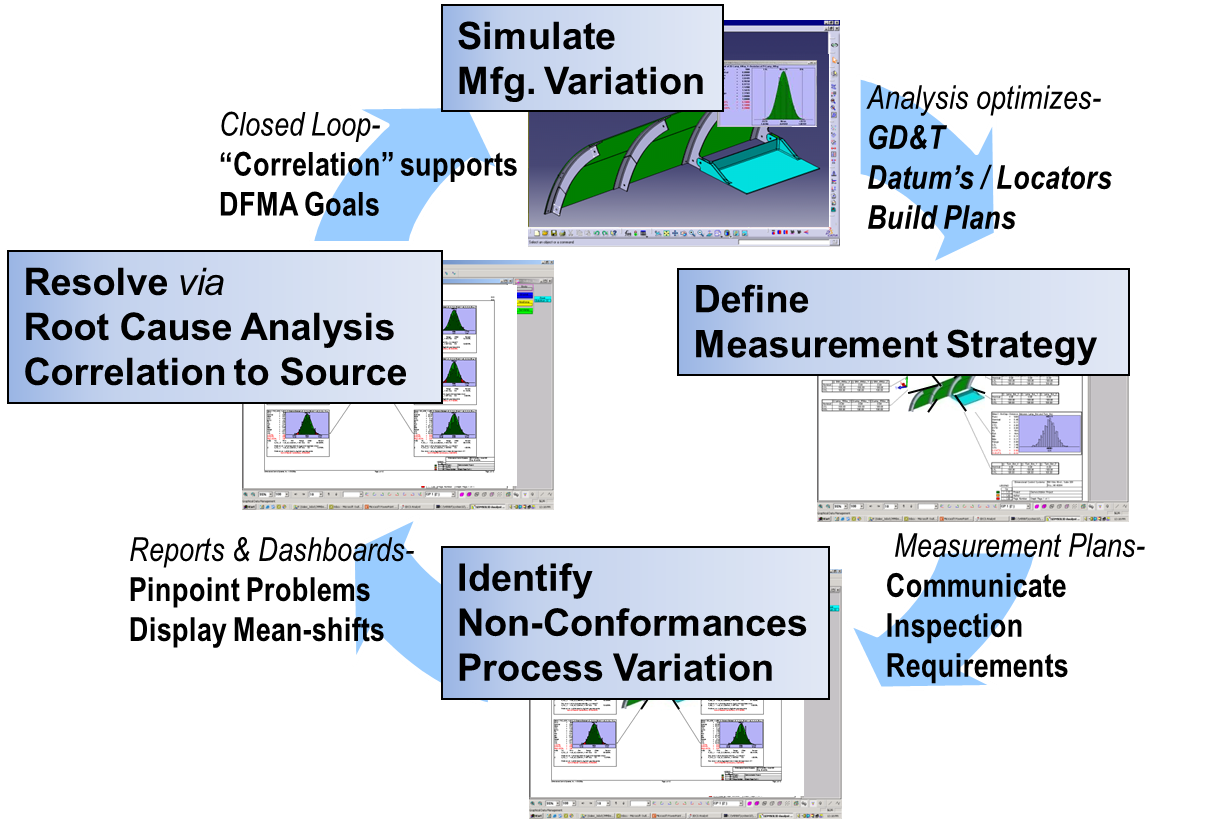
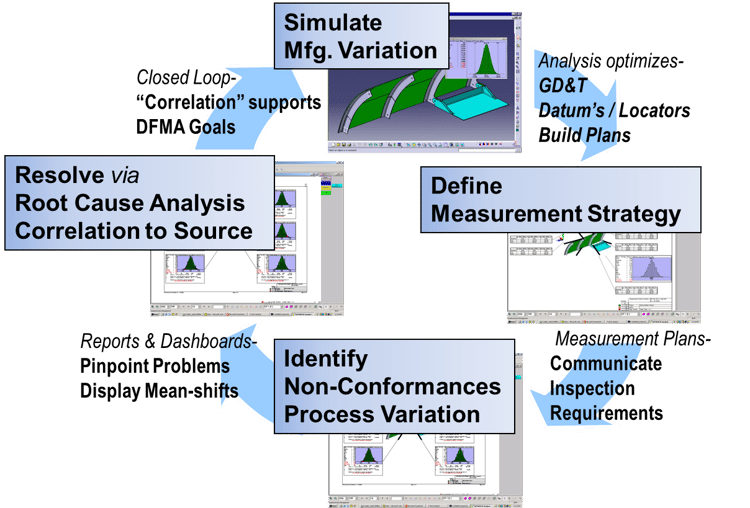
Closed loop manufacturing is a Closed Loop Process of manufacturing and inspection (measuring). The key element to a closed loop process is inspection in manufacturing. By feeding the inspection data upstream in the process, designs can be continuously improved. The goal is to reduce quality costs like scrap and rework while improving the quality and accuracy of the produced parts.
%20-%20PTC%20Creo%20Parametric.png?width=750&name=2017-01-06%2014_16_40-PHONE_COMPLETE%20(Active)%20-%20PTC%20Creo%20Parametric.png)
In order for CAD to drive the manufacturing process, the OEM needs to be utilizing simulation to validate GD&T and assembly processes. This is a form of Design for Manufacture and Assembly (DFMA) connected to Model Based Definition, whereby the CAD model becomes the sole source of information, GD&T and drawings and is used in simulation to pre-determine production issues and the viability of production. This process does not have to be fully implemented, but in order for a Closed Loop Process to exist, there must first be a process for using and applying CAD simulation. This works best when simulation is being conducted at both the OEM and the Supplier, but can work when only the OEM is using simulation. There are a variety of reasons both OEM’s and Suppliers would utilize simulation, and they are not always for the same purposes.
DCS is hosting a webinar on how to use your 3DCS and CAD models to drive downstream quality improvement to both manufacturing plants and suppliers.
Join the FREE webinar on March 22 to learn more.
Part 3: 3DCS V7.5 – How to Use Your 3DCS Model for Downstream Quality - Measurement Reports, Tolerance Negotiation and Management Reports Thu, Mar 22, 2018 11:00 AM - 12:00 PM EDT -- Create measurement plans and manager reports from 3DCS for downstream manufacturing professionals, and suppliers.
See how to close the loop in 3DCS Variation Analyst with the Performance Improvement Webinar: Closing the Loop on Quality

A “closed-loop” variation analysis system enables engineers to correlate the theoretical tolerance analysis results produced during simulation to the actual as-built results determined at other stages of the quality process. Based on correlations, the as-designed simulation parameters can be validated, or the as-designed simulation parameters can be adjusted to more closely align to production process capabilities.
Additionally, a closed-loop system enables best practices to be validated, captured and reused on future programs, for both engineering simulation and manufacturing. Leading OEMs are beginning to use closed-loop systems to improve their program efficiency as they continually face tighter and tighter development cycles and budgets. The intelligence they gather through this system helps them discover ways to reuse existing and proven manufacturing process elements and modularized tooling on new and re-design programs – saving time and cost.
Learn more about the value of closing the loop

Simulation (Monte Carlo) provides statistical analysis of possible build issues, allowing manufacturers to validate their GD&T and Assembly Process. These analyses focus on finding the primary contributors to variation in the end product to allow designers to optimize GD&T to increase quality in those areas, while relaxing quality demands (often tolerances) in non-critical areas. This can improve the assembly process while decreasing the overall manufacturing cost of the parts.
The other output of these analyses are the key areas to quality, the Critical to Quality Features. By incorporating the data points and virtual measurements of these areas into the measurement process during production, manufacturers can more accurately monitor the quality of their products, and be ready to take action should an issue arise.
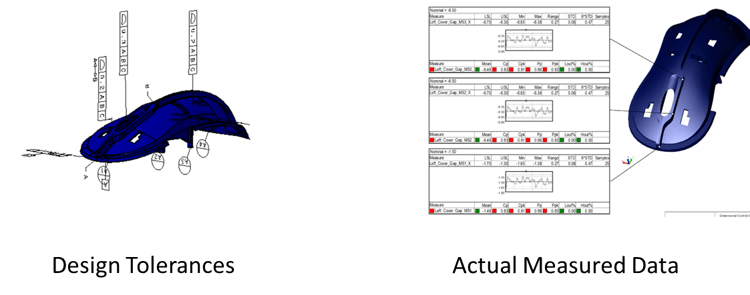
Using the Critical to Quality Features and virtual measurements from CAD simulations to create measurement plans for the OEM and suppliers, the manufacturer can make sure that those areas key to the product's quality are being effectively monitored for non-conformance.
DCS provides an automated tool for creating measurement plans from the CAD data, as well as a measurement plan authoring tool integrated into CATIA.
Once the measurement plans are created, they need to be communicated to the plant and inspection lab. The plans are used to write CMM routines, or used with graphical reports to measure parts with gages, measuring arms and hand scanners.
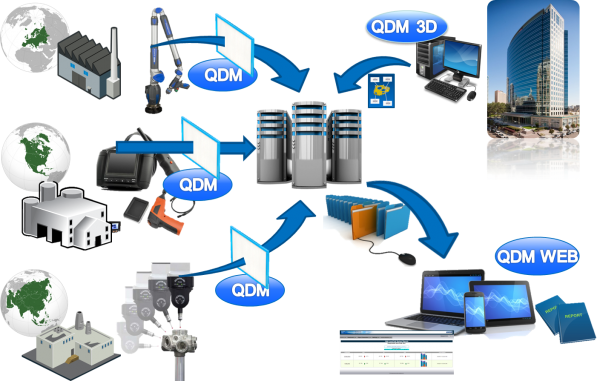
This data, once collected, should be delivered into a SPC System, such as QDM WEB, to be standardized and analyzed in real time so that any trends toward specification limits can be quickly identified and rectified.
Should an issue arise that cannot be quickly fixed by identifying the source, such as wear and tear on a machine, operator error, damage to molds or similar fixable issues, the data can be brought back into the CAD model. This is possible because the measurement plans and CMM routines are based on the CAD points used in simulation during design.
This allows for point-to-point correlation of data to instantly build a virtual model of the production parts. This model can then be run through variation and tolerance analysis simulations to find the true source of the problem, and then further used for iterative design changes to test and validate solutions. This process can resolve production problems in much less time, and at a much lower cost than traditional methods of trial and error or reworking large volumes of parts.
Once production is complete, use the collected information from production and from root-cause analysis simulations to improve the design for further production runs. This information can also be archived for historical reference to improve the quality of future projects based on similar design specifications by giving a better base line.
Jaguar Land Rover is using Closed Loop Manufacturing across their global enterprise. Learn more from their 2017 DCS User Conference presentation.
3DCS Variation Analyst Software and QDM SPC Software can be combined to close the loop in your manufacturing process without a need for overall production process changes. Here is a basic breakdown of the process:
Download the 'How-To' PDF for Setting Up Closed Loop Manufacturing with 3DCS & QDM
See how to close the loop in 3DCS Variation Analyst with the Performance Improvement Webinar: Closing the Loop on Quality

With standardized measurement plans generated from the CAD model, the next step is get that information to suppliers. Once distributed, the resulting measurements can be collected for analysis.
Using a Central SPC System, like QDM WEB, manufacturers can connect to their suppliers through multiple methods, based on security and existing processes. Here are three methods to connect your suppliers:
By creating a web location for the supplier to upload data to, the manufacturer can create a closed window for suppliers to send information directly into the SPC system for analysis and reporting without giving direct access to the information in the system.
Through a shared network folder and specified network port, manufacturers can automate the collection of inspection data from suppliers. This will automatically pull all saved inspection data on a rotating time schedule, for example, every minute, every five minutes, etc. This makes sure that measured data is always available for analysis and removes the need for manual uploads and file movement.
By giving the supplier a Client Login through either the Cloud System Setup (Software as Service) or by assigning one of the QDM SPC System's clients to the supplier, the supplier can be given controlled access to the system. This allows for the upload of inpsection data, but also lets the supplier see their quality analytics through the eyes of their customer, and download measurement plans, reports and other information they need directly from the system instead of having to be sent via other means.
Learn more about DCS's Supplier Quality Solution
Simulation and closed loop analysis can provide powerful insight to a supplier during tolerance negotiation with their customer. Output reports from simulation tools like 3DCS can be used directly, or the Tolerance Negotiator in QDM ANALYST can be used to show whether tolerances need to be modified to be larger or smaller based on analysis results. This gives suppliers factual evidence to support their requests for looser or tighter tolerances on any given part and can greatly improve the negotiation process.
It is important to understand what your customer will see when you send them your parts and inspection data. Using QDM or similar SPC tools, suppliers can see their own quality through the lens of their customer, viewing identical reports to what their customer will use, but before sending any parts. This gives the supplier the chance to see any issues and correct them before parts leave their production facility and enter their customers.
Similar to the above benefit, but taken to the next level. By having access to the SPC System through a client, the supplier can use the system to view dashboards and reports of their own production, utilizing the system to monitor their production quality, and resolve any issues before sending any parts, and understand how their quality looks from their customers perspective.
By having access to the same SPC system, or by getting the Measurement Plans, suppliers can very clearly understand where to measure and how to measure their parts so that their results are the same as their customers. This is important to any quality process, as oftentimes, suppliers have to interpret the drawings and GD&T and decide how to measure the parts, which is different than how their customer interprets the same drawings. Without correlation between the two measurement methods, the measurement results from the supplier may not be used by their customer, and the supplier may not even know if their parts meet specifications until their customer already has them!
This process is used by Hella to support their negotiations. Learn more about their efforts from the DCS 2017 User Conference (scroll down halfway).
DCS is hosting a webinar on how to use your 3DCS and CAD models to drive downstream quality improvement to both manufacturing plants and suppliers.
View the Webinar ON DEMAND
Part 3: 3DCS V7.5 – How to Use Your 3DCS Model for Downstream Quality - Measurement Reports, Tolerance Negotiation and Management Reports Thu, Mar 22, 2018 11:00 AM - 12:00 PM EDT -- Create measurement plans and manager reports from 3DCS for downstream manufacturing professionals and the quality team.
These Stories on CATIA
No Comments Yet
Let us know what you think