
 Tips & Tactics are helpful articles that demonstrate useful tips and methods of dimensional analysis and modeling to speed up the rpocess and make the overall process of building a model easier.
 You'll find these most helpful if you use 3DCS Variation Analyst CAA V5 Based, the fully integrated solution with CATIA V5-V6.
When building a CATIA assembly with joints and/or constraints, there are a few key rules to keep in mind.
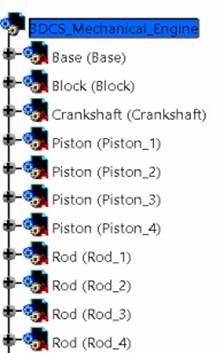
Rules for Building an Assembly
1. Know which assembly or sub-assembly to build in.
a. Parts that need specific measurement controlb.
b. Parts that make up a sub-assembly need
to be controlled/constrained within that sub-assembly

2. Know which constraints or joints to use.
a. Constraints are basic restrictions for 3D geometry.
b. Joints apply the same restrictions for 3D geometry, but also add kinematic parameters to show the motion of the part.
3. When building an assembly, first apply the constraint to the moving part and then to the fixed or non-moving part.
4. Turn off automatic update; this will stop the constraints, measures, and parts from automatically updating.
a. This also allows manual updates to the assembly, which will allow more control while building the assembly.
If the assembly structure has multiple parts but no sub-assemblies, apply a Fixed Constraint to the part that is not intended to move. Then apply other constraints from the moving part(s) to the fixed part. The fixed constraint is just to ensure the primary part remains stationary.
If the assembly has multiple sub-assemblies, first apply constraints to the parts under the sub-assembly.
Note that a  Fixed Constraint can be used in the sub-assembly to ensure the parts won’t move in different or multiple directions. The Fixed Constraint will not affect the
upper level assemblies. Make sure to activate the sub-assembly to apply constraints, as CATIA will not
automatically apply the constraints to the sub-assembly.
Whenever constraints are being applied, the user can “build” the assembly by using ![]() Update All. This will verify that the direction is correct, or if the constraint is correct for the scenario. Then use the Undo button to undo the constraint on the part(s).
Update All. This will verify that the direction is correct, or if the constraint is correct for the scenario. Then use the Undo button to undo the constraint on the part(s).
Rigid Assembly (default):
A rigid product (CATIA default) is an assembly of parts that, in terms of building the assembly with constraints, will use the assembly as a whole. If the sub-assembly has constraints, those constraints will act as normal but the upper level constraints will apply to the entire sub-assembly.
Flexible Assembly:
A flexible product is an assembly of parts that, in terms of building the assembly with constraints, will use the individual parts under the sub-assembly. Parts under a flexible assembly still require constraints to be built under the required sub-assembly.
If the sub-assembly has constraints, those constraints will act as normal but the upper level constraints will apply to the individual parts and build accordingly with Degrees of Freedom. To switch the product from a rigid assembly to a flexible assembly, right-click on the assembly and highlight the Product1 object and select  .
.
Additionally, in Assembly Design, the same icon is on the Constraints toolbar.
To learn more about 3DCS and CATIA, visit http://www.3dcs.com/catia.html or visit the DCS Community Site.

North American Innovation Center
28064 Center Oaks Ct A, Wixom, MI 48393
Call us: +1 (248) 504 6200


No Comments Yet
Let us know what you think